
RASPBERRY PI
Introduction
 Sai info solution provide
the project development and training. We developed project for BE/ME/PhD. The Raspberry Pi is a
series of small single-board computers developed in the United
Kingdom by the Raspberry Pi Foundation to promote the teaching
of basic computer science in schools and in developing countries.
The original model became far more popular than anticipated, selling
outside its target market for uses such as robotics. It does not
include peripherals (such as keyboards and mice ) and cases.
However, some accessories have been included in several official and unofficial
bundles.
Sai info solution provide
the project development and training. We developed project for BE/ME/PhD. The Raspberry Pi is a
series of small single-board computers developed in the United
Kingdom by the Raspberry Pi Foundation to promote the teaching
of basic computer science in schools and in developing countries.
The original model became far more popular than anticipated, selling
outside its target market for uses such as robotics. It does not
include peripherals (such as keyboards and mice ) and cases.
However, some accessories have been included in several official and unofficial
bundles.
The organisation behind the
Raspberry Pi consists of two arms. The first two models were developed by the
Raspberry Pi Foundation. After the Pi Model B was released, the Foundation set
up Raspberry Pi Trading, with Eben Upton as CEO, to develop the third
model, the B+. Raspberry Pi Trading is responsible for developing the
technology while the Foundation is an educational charity to promote the
teaching of basic computer science in schools and in developing countries.
According to the Raspberry Pi
Foundation, more than 5 million Raspberry Pis were sold by February 2015,
making it the best-selling British computer. By November 2016 they
had sold 11 million units, and 12.5m by March 2017, making it the third
best-selling "general purpose computer".In July 2017, sales reached
nearly 15 million.
In March 2018, sales reached 19
million.
What you will need
Hardware
o 1. A Raspberry Pi computer with an SD card
o 2. A monitor with a cable (and, if needed, an HDMI adaptor)
o 3. A USB keyboard and mouse
o 4. A power supply
o 5. Headphones or speakers (optional)
o 6. An ethernet cable (optional)
Software
o Raspbian, installed via NOOBS
Meet the Raspberry Pi
Let’s take a look at the Raspberry Pi. You should have a Raspberry Pi computer in front of you for this. It shouldn’t be connected to anything yet.
o Look at your Raspberry Pi. Can you find all the things labelled on the diagram?

o USB ports — these are used to connect a mouse and keyboard. You can also connect other components, such as a USB drive.
o SD card slot — you can slot the SD card in here. This is where the operating system software and your files are stored.
Ethernet port — this is used to connect the Raspberry Pi to a network with a cable. The Raspberry Pi can also connect to a network via wireless LAN.
Audio jack — you can connect headphones or speakers here.
HDMI port — this is where you connect the monitor (or projector) that you are using to display the output from the Raspberry Pi. If your monitor has speakers, you can also use them to hear sound.
Micro USB power connector — this is where you connect a power supply. You should always do this last, after you have connected all your other components.
GPIO ports — these allow you to connect electronic components such as LEDs and buttons to the Raspberry Pi.
Connect your Raspberry Pi
Let’s connect up your Raspberry Pi and get it running.
Check whether your Raspberry Pi already has an SD card in the slot at the underside, and if not, insert an SD card with Raspbian installed (via NOOBS).


- Find the USB connector for your mouse, and connect the mouse to one of the USB port on the Raspberry Pi (it doesn’t matter which one).

- Connect the keyboard in the same way.

- Look at the HDMI port on the Raspberry Pi — notice that it has a large flat side on top.

Make sure your monitor is plugged into a wall socket and turned on.o Connect the monitor cable to the Pi’s HDMI port — use an adapter if necessary.Nothing will display yet.o If you want to connect the Pi to the internet via Ethernet, use an Ethernet cable to connect the Ethernet port on the Raspberry Pi to an Ethernet socket on the wall or on your internet router. You don’t need to do this if you’ll be using WiFi or if you don’t want to connect to the internet.
- Sound will come from your screen if it has speakers or you can connect headphones or speakers to the audio jack if you have them.

- Notice that the micro USB power port has a longer flat side on top.Plug the power supply into a socket and connect it to the micro USB power port.

You should see a red light on the Raspberry Pi and raspberries on the monitor.The Pi will boot up into a graphical desktop.


Finish the setup
When you start your Raspberry Pi for the first time, the Welcome to Raspberry Pi application will pop up and guide you through the initial setup.
o Set your Country, Language, and Timezone, then click Next again.

o Enter a new password for your Raspberry Pi and click Next.

- Connect to your WiFi network by selecting its name, entering the password, and clicking Next.

Note: if your Raspberry Pi model doesn’t have wireless connectivity, you won’t see this screen.
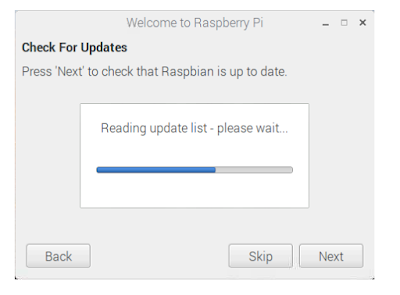
- Click Next let the wizard check for updates to Raspbian and install them (this might take a little while).
- Click Done or Reboot to finish the setup.


Browsing the web
You might want to connect your Raspberry Pi to the internet. If you didn’t plug in an ethernet cable or connect to a WiFi network during the setup, then you can connect now.
- Click the icon with red crosses in the top right-hand corner of the screen, and select your network from the drop-down menu. You may need to ask an adult which network you should choose.


Set WIFI Country


- Type in the password for your wireless network, or ask an adult to type it for you, then click OK.
- Click the web browser icon and search for
raspberry pi.

Challenge: explore the Raspberry Pi
Take a tour of the menu — can you find:
- A version of Scratch?
- A Python game to play?
- A version of Minecraft that you can program?
If anyone is interested for doing
Research in above subject for BTech/MTech/PHD Engineering project work
Kindly Contact Below
Contact Details:
Santosh Gore Sir
Ph:09096813348 / 8446081043 /
0253-6644344
Email: sai.info2009@gmail.com


No comments:
Post a Comment